Draw angle online
Angle Maker: Draw an Exact Angle from Any Degree
Type an angle between 0° and 360° and this free angle maker draws it instantly: two rays, a vertex, an arc and a degree label. Make acute, right, obtuse, straight or reflex angles, hide the value for “measure this angle” questions, build a whole worksheet of random angles, and download a high-resolution PNG or SVG you can use commercially.
- Free, no sign-up
- 0° to 360°
- Hide value for worksheets
- Random angle worksheets
- PNG · SVG · copy
Angle
65° is an acute angle (less than 90°). Complement: 25°. Supplement: 115°. Explement: 295°.
Labels & value
Degree valueLayout
PNG size & background
The PNG stores its print size, so Word and Google Docs insert it at about 7 cm wide. Every PNG and SVG also contains the project, so you can drop it back into the Geometry Editor to keep editing.
How to use the angle maker
- 1
Enter the degrees
Type any size from 0° to 360°, use the slider, or click a preset such as 45°, 90° or 135°. Decimals such as 37.5° work too.
- 2
Name the points
Label the vertex and one point on each ray, for example ∠ABC with B at the vertex. Turn labels, dots or arrowheads on and off.
- 3
Choose the value
Show the degree value, hide it for a “measure this angle” question, or replace it with a custom label such as θ, x or 2x + 10°.
- 4
Adjust the layout
Rotate the first ray, change the length of the second ray, draw clockwise, add up to three arcs, or lay a protractor under the angle.
- 5
Export
Download a PNG sized for print or an SVG, or copy the image and paste it into Google Docs, Slides, Word or Canva.
- 6
Need many angles?
Switch to Worksheet of angles to generate 4–12 random angles, numbered, with a matching answer key.
Angle types at a glance
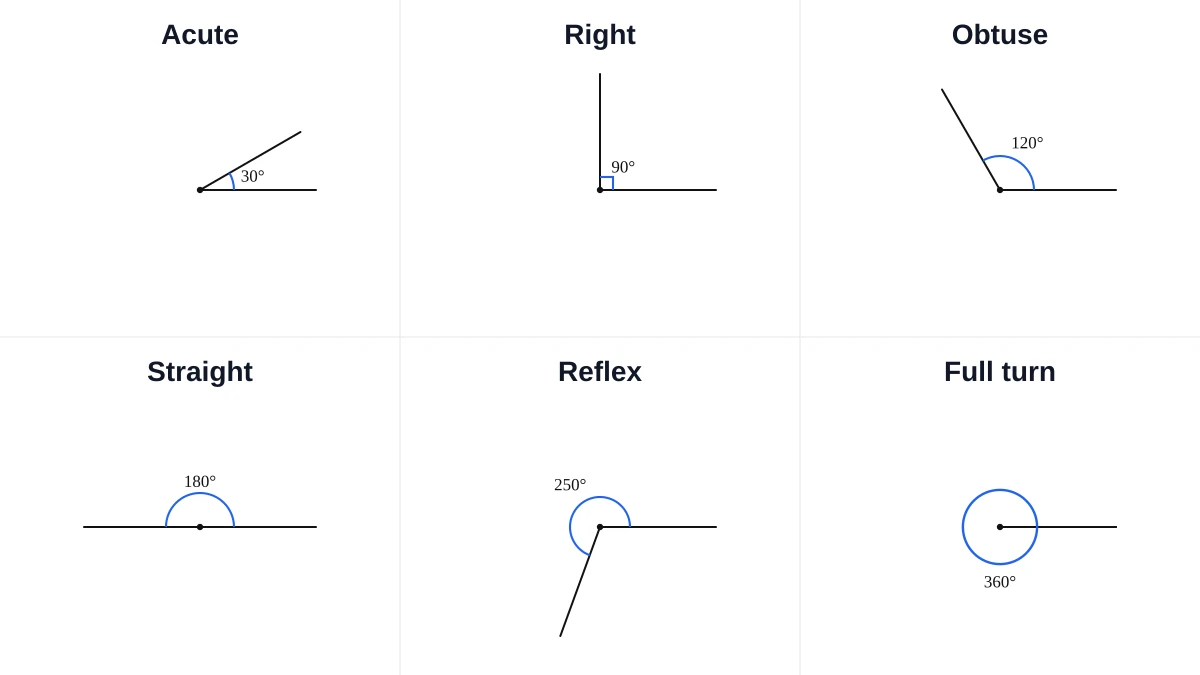
Angles are grouped by size. The angle maker tells you the type of every angle you draw, together with its complement, supplement and explement.
| Type | Size | Example |
|---|---|---|
| Acute | More than 0° and less than 90° | 30°, 45°, 60° |
| Right | Exactly 90° (a quarter turn) | The corner of a square |
| Obtuse | More than 90° and less than 180° | 120°, 135°, 150° |
| Straight | Exactly 180° (a half turn) | A straight line |
| Reflex | More than 180° and less than 360° | 210°, 270°, 300° |
| Full turn | Exactly 360° | One complete rotation |
Related pairs: complementary angles add up to 90°, supplementary angles add up to 180°, and a reflex angle and the angle on the other side of its rays (its explement) add up to 360°.
Make a “measure the angle” worksheet
Measuring angles with a protractor is a grade 4 skill in the US Common Core (standard 4.MD.C.6) and appears in Key Stage 2 in England. The angle maker gives you two ways to build practice sheets.
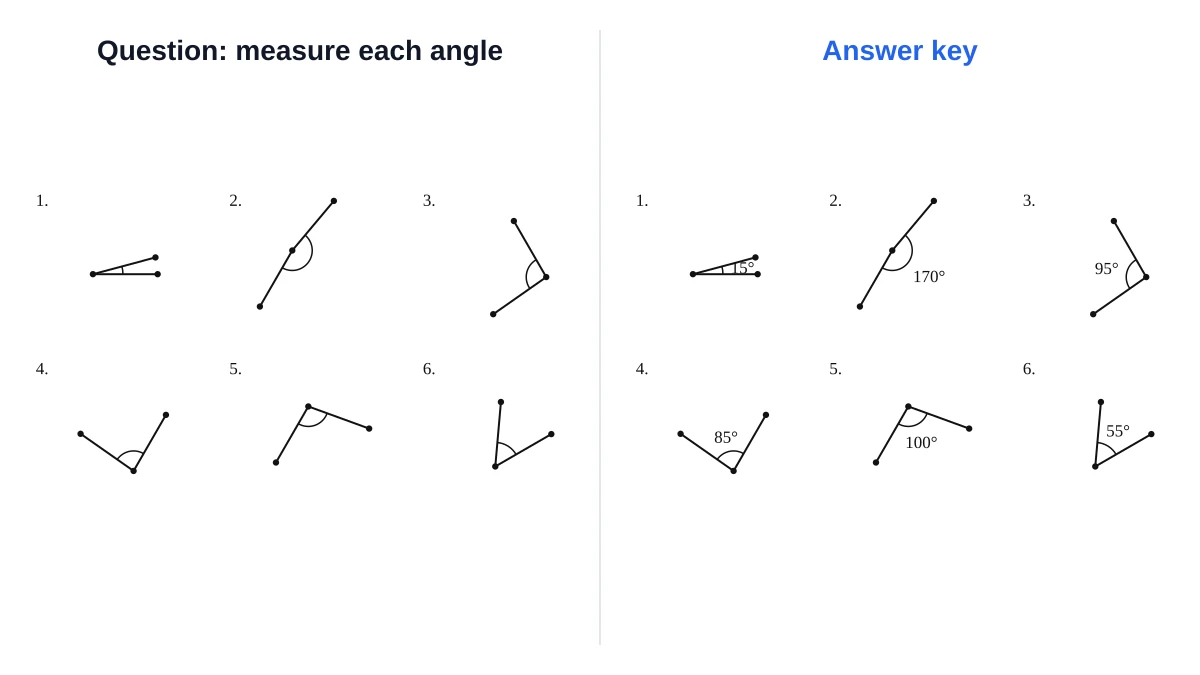
One angle: question and answer key
Set Degree value to Hide (worksheet). The Question version shows the arc with no number, so students measure it; the Answer key version shows the value. Export each version once.
A whole sheet of random angles
Choose Worksheet of angles, pick how many angles you want, the angle types and whether values are rounded to 1°, 5° or 10°. Each click on New random set makes a fresh sheet with its own answer key.
Choosing angles for each level
- Beginners: multiples of 10° with the first ray horizontal, so the reading starts at 0° on the outer scale.
- Developing: multiples of 5°, rotated randomly, so students must line up the protractor themselves.
- Confident: any whole degree, plus reflex angles that need 360° minus the measured angle.
Using the images in Google Slides, Canva or Teachers Pay Teachers
PNG works everywhere, including Google Docs and Slides. SVG stays sharp at any size in Canva, PowerPoint, Keynote and design apps. You may use the images in free and paid teaching resources; no attribution is needed.
How to draw an angle by hand with a protractor
- Draw a straight line with a ruler. This is the first ray. Mark one end as the vertex.
- Put the protractor’s centre point exactly on the vertex and line up its baseline with the ray.
- Find the scale that reads 0° where your ray is. Follow that scale round to the angle you need and make a small mark.
- Remove the protractor and join the vertex to the mark with a ruler.
- Draw a small arc between the rays and write the size, or label the points (for example ∠ABC).
Inner or outer scale?
A protractor has two scales that run in opposite directions. Always use the one that starts at 0° on your first ray. If you read the other scale you get the supplement (180° minus the angle) by mistake, for example 130° instead of 50°.
Drawing a reflex angle
A half-circle protractor only goes to 180°. To draw 250°, draw 360° − 250° = 110° and mark the arc on the outside, or draw a straight line (180°) and add 70° beyond it. In the angle maker, just type 250 and the arc goes on the larger side.
Naming and labeling angles
- Three letters: ∠ABC means the angle at B between rays BA and BC. The vertex is always the middle letter.
- One letter: ∠B is fine when only one angle sits at B.
- Greek letters or numbers: θ, α, β or ∠1 label an angle without naming the points. Use the custom label box for these.
- Right angles are marked with a small square instead of an arc. The angle maker does this automatically at exactly 90°.
Common mistakes when drawing angles
- Reading the wrong scale on the protractor, which gives 180° minus the correct angle.
- Putting the edge of the protractor, instead of its centre mark, on the vertex.
- Drawing rays too short to reach the protractor’s scale. Make rays at least as long as the protractor radius.
- Giving the small angle when the question asks for the reflex angle (or the other way round).
- Printing at “fit to page”, which changes lengths. Angles stay correct at any scale, but lengths do not, so print at 100% if lengths matter.
Angle maker FAQ
Type the degree (0–360) into the angle maker. It draws the angle to scale with an arc and a label. Then download it as PNG or SVG, or copy it to the clipboard.
Yes. Angles between 180° and 360° are reflex angles. Type the size and the arc is drawn on the larger side of the two rays.
Set Degree value to Hide (worksheet). The Question version keeps the arc but no number, so students can measure it. Switch to Answer key to export the version with the value.
Yes. The angle is calculated exactly and exported as a vector SVG or a high-resolution PNG. Printing at any scale keeps the angle the same; keep the rays long enough to reach the protractor's scale.
Yes. Angles you make with GeometryKit can be used in classroom materials and in products you sell. No attribution is required.
Acute angles are less than 90°, a right angle is exactly 90°, obtuse angles are between 90° and 180°, a straight angle is exactly 180°, and reflex angles are between 180° and 360°.
The middle letter is the vertex and the other two letters are points on each ray. ∠ABC is the angle at B between BA and BC.
With a compass and straightedge you can construct 60° (an equilateral triangle), 90° (a perpendicular), and halve them to get 30° and 45°. For any other angle, use a protractor or print one from the angle maker.
Yes. Choose Worksheet of angles, pick 4 to 12 angles, the angle types and the rounding. You get a numbered sheet and a matching answer key.
No. The angle maker runs in your browser, it is free, and nothing you make is uploaded to a server.
Last updated · GeometryKit is free to use for classroom and commercial worksheets.